How to Make Model Planes
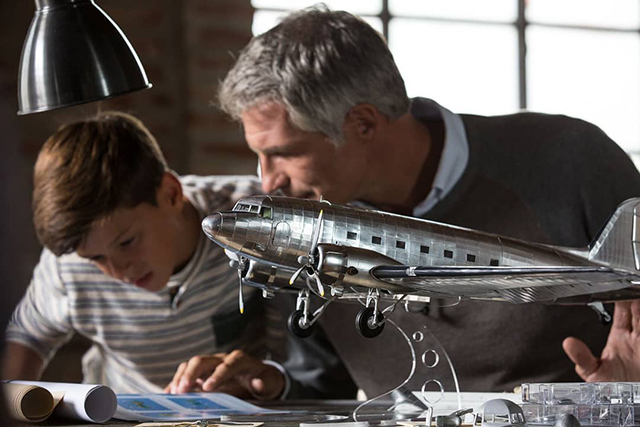
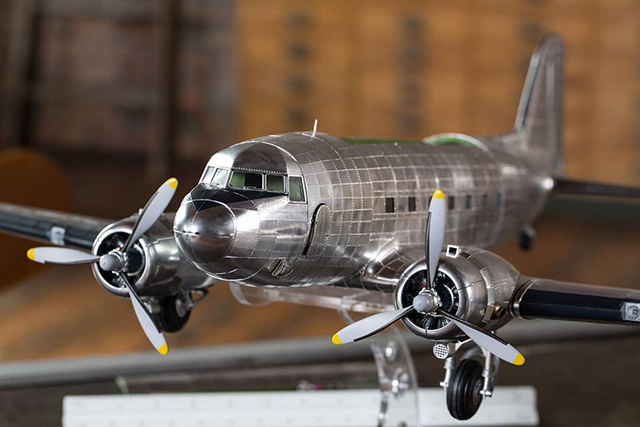
There’s something magical about planes – their ability to soar above the clouds, giving us a unique view of our world far below. Likewise, there’s something thrilling and rewarding about capturing your favourite plane in the form of a highly detailed scale model. Whether you’re building a famous fighter plane like the Spitfire, or an aviation icon like the Douglas DC-3, follow the tips below to learn how to make model planes!
Which plane to build?
As with any scale model kit, the first step when learning how to make model planes is to decide which plane you want to build. Do you want a wartime legend such as the Supermarine Spitfire or Boeing B-17 Flying Fortress? A supersonic speedster like the Concorde? Or perhaps a commercial carrier such as the Boeing 737? With such a wide variety of planes on offer, the scale model skies are yours to command! Below are some of the world’s most iconic planes to give you some inspiration:
- Wright Flyer
- Airbus A380
- Supermarine Spitfire
- Douglas DC-3
- Messerschmitt Bf 109
- Boeing B-17 Flying Fortress
- Concorde
- Cessna Citation XL
- Sopwith Camel
- Mitsubishi A6M Zero
- Boeing 737
- Fokker Dr.I Red Baron
- Lockheed SR-71 Blackbird
Find and follow the instructions
Once you’ve chosen the scale model plane kit you want to build, the next thing you need to do is get your hands on the build instructions. This step applies whether you’re building from a prepared kit, or scratch building.
Every quality model plane kit should have step-by-step instructions to guide you through the process. Even if you’re building from scratch, we recommend finding some general model plane instructions that align with what you want to achieve. This will help keep you on track, and avoid any unnecessary mistakes. Once you’re comfortable that your model is on the right track, feel free to add your own creative flair to transform your model plane into a work of art!
Cockpit comes first
If you’re just learning how to make model planes, this is a key step in the process. Once complete, the cockpit will be enclosed within the plane’s fuselage. We recommend constructing, painting, and detailing your cockpit first so that you can confidently seal it inside. The last thing you want is to pull apart your model plane to fix your cockpit!
What’s in a frame?
From small scale planes to life-size replicas, or even the real thing, a plane needs a solid framework in order to fly. Are you building with balsa, plywood, or die-cast metal? Each material will give you a different result, and will require a different approach. From the tail to the wings, the cockpit to the fuselage, it’s important to piece it together first before gluing. Make sure you have all the pieces, and that those pieces are in the correct place and aligned correctly. Once everything is in place and there are no observable gaps, use minimal glue. A pin can be used to ensure smooth and even application.
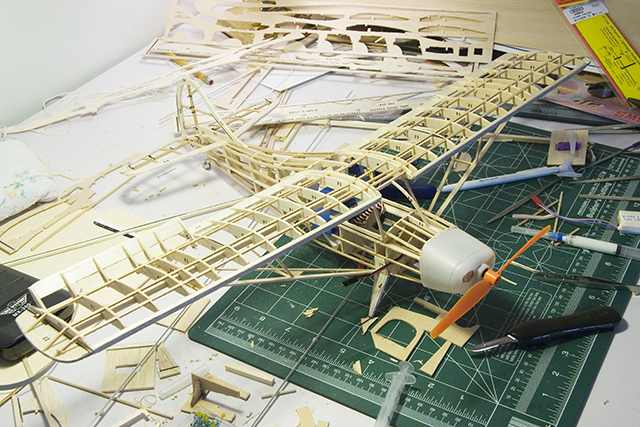
Fuselage and finishing
Once your frame is completed, you can apply the fuselage and other exterior components. As with the frame, pay close attention to the placement and alignment of all pieces, and use glue sparingly to avoid unsightly surface bumps. Taping pieces together before gluing is a great way to ensure they stay in the correct position. Once all exterior parts are glued in place, all you need to do is decide how you want your model plane to look. Polished and pristine? Or weathered and battle-worn? Check out our paint guide and weathering guide for more great tips!
This blog is only an introduction on how to make model planes, but hopefully it gives you a starting point and some inspiration for your next project! If you’re looking for more advice on a range of different scale model topics, check out the rest of our guide blogs now! Good luck with getting your model plane off the ground – we look forward to seeing your projects soar!


