Scale Modelling: Beyond the Basics
If you’ve been building scale models for a while now, chances are you’ve got a good handle on the basics – what tools to use, how to be creative with household items, establishing a well-prepared workspace, and what paint and glue works best.
But what comes next?
Like us, you’re probably aware that model making is a hobby where you never truly know everything, and there’s always a new trick or tip that can make your finished model stand out a little more. In the interest of helping you grow as model makers, we’ve prepared a few such tips below to help you extend your skills and take your scale model building to the next level.
Use Decals to Make your Model Pop
Depending on the model you are building, applying decals can really give it a point of difference. After the necessary preparation (cleaning the surface, marking locations), use a suitable setting solution to apply the decals to your model. Once the decals are dry, it pays to apply a gloss coat to set it properly before applying your final gloss or matte coat to complete the model.

Don’t Forget Defined Panel Lines
To give your model greater definition and make the panel lines really stand out, use a thin brush to apply a dark oil-colour (brown or black) into the lines prior to your final coat. Wait for the oil to dry then apply more if it is still too light, or use a wet Q-Tip cotton swab to tidy up any mistakes or excess oil.
A brand new looking model will always look good on display, but if you’re keen to have that more weathered or aged look then chipped paint is an excellent technique to use
Create Realism with a Chipped Paint Effect
A brand new looking model will always look good on display, but if you’re keen to have that more weathered or aged look then chipped paint is an excellent technique to use. Here’s a quick run-down on how to achieve this:
- Apply your base paint colour and allow to dry
- Apply water where you want the chipped paint to appear – use a paint brush to dab it on in small doses, and avoid run-off or it will ruin the effect
- Apply salt to the watered areas either using fingers or a brush – once applied, avoid touching it too much or it will dissolve
- Once the water and salt has completely dried, apply your top paint coat and allow to dry
- Brush away the salt areas to reveal the base coat
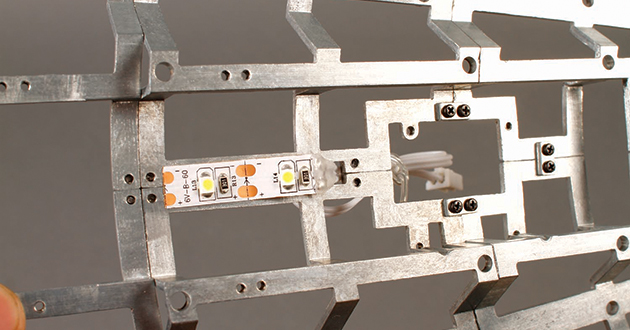
Make your Model Shine (Literally) with Fibre Optics and LED Lighting
If you are working on an RC car or our Millennium Falcon replica, installing LED lights can give your scale model an incredible effect that really makes it come to life.
You will need to procure a lighting package (or assemble your own), which should contain a power supply such as a 9V battery, LED lights or fibre optics, and necessary wiring. In addition, you may require a drill to create ample access areas within your model.
As an example, here is an excellent Millennium Falcon build diary from ModelSpace Forum user, colson, which uses fibre optics to their full effect: http://forum.model-space.co.uk/default.aspx?g=posts&t=15379
There are endless ways to improve your scale model building, and the above techniques only scratch the surface of what you can achieve. We’re always looking to spread innovative and creative build tips to the scale model community, so please continue to share your advice in our forum and on the ModelSpace Facebook page.


